1. 파이프라인 학습 패턴
머신러닝에서 학습은 여러 프로세스로 분할할 수 있다. 일반적으로는 데이터 수집, 전처리, 학습, 평가, 빌드를 거치게 된다. 각 프로세스를 순차적인 작업(Job) 단위로 실행함으로써 학습의 도중 경과를 기록하고 재사용이나 부분적인 수정을 용이하게 해준다. 또한 각 프로세스는 상황에 따라 한번만 수행되는 것이 아니라 여러번 수행될 수 있는데 이를 자동화 하는 방법 또한 고려할 수 있을 것이다.
이번 포스팅에서는 머신러닝의 기본적인 컴포넌트(데이터 수집, 전처리, 학습, 평가, 빌드)를 MLflow 파이프라인으로 구성하여 모델 학습 및 평가를 진행해보고 리눅스의 cron을 활용하여 배치작업으로 학습 프로세스를 자동 실행하는 방법에 대해 알아보자
Use Case
- 학습 파이프라인의 자원을 분할해 각 작업에서 라이브러리의 선정이나 다른 용도로 사용을 가능하게 하고 싶은 경우
- 작업마다 데이터의 상태나 진행 로그를 기록해 간단하게 재시도하고 싶은 경우
- 각 컴포넌트의 experiment를 개별로 컨트롤하고 싶은 경우
해결하려는 과제
머신러닝의 학습 단계에서는 수집, 전처리한 데이터로 모델을 학습하고 평가한다. 이러한 workflow는 전처리, 학습, 평가, 빌드, 시스템 평가로 정의되는 것이 일반적이다. 각 컴포넌트(프로세스)에서는 가공된 데이터나 모델, 평가치 등이 결과로 도출되고, 다음 컴포넌트로 입력된다. 따라서 학습의 workflow는 데이터가 순차적으로 흘러가는 데이터 파이프라인에 가까운 처리를 수행한다고도 볼 수 있다.
파이프라인 학습 패턴에서는 각 단계의 결과를 기록해 두었다가 중간에 다시 실행할 수도 있다. 예를 들어 학습까지 완료된 상태라면 학습에서 생성한 모델 파일을 통해 평가, 빌드 과정을 실행할 수 있다. 또한 학습을 진행하는 과정에서 학습 중간에 모델을 체크포인트 파일로 출력해놓으면 그 시점부터 다시 학습을 시작할 수도 있다. 컴포넌트의 각 단계를 순차적으로 실행해 쉽게 테스트 할 수 있다는 것도 파이프라인 개발의 장점이다. 컴포넌트 간 의존성을 파일 입출력으로 제한해 컴포넌트 단위로 개발하고 테스트 할 수 있는 것이다.
Architecture
각 작업을 개별 자원(서버, 컨테이너, 워커 등)으로 분할해서 작업 실행 환경을 별도로 구축할 수 있다. 이에 따라 작업의 실행이나 재실행, 도중 정지를 유연하게 실현할 수 있다.
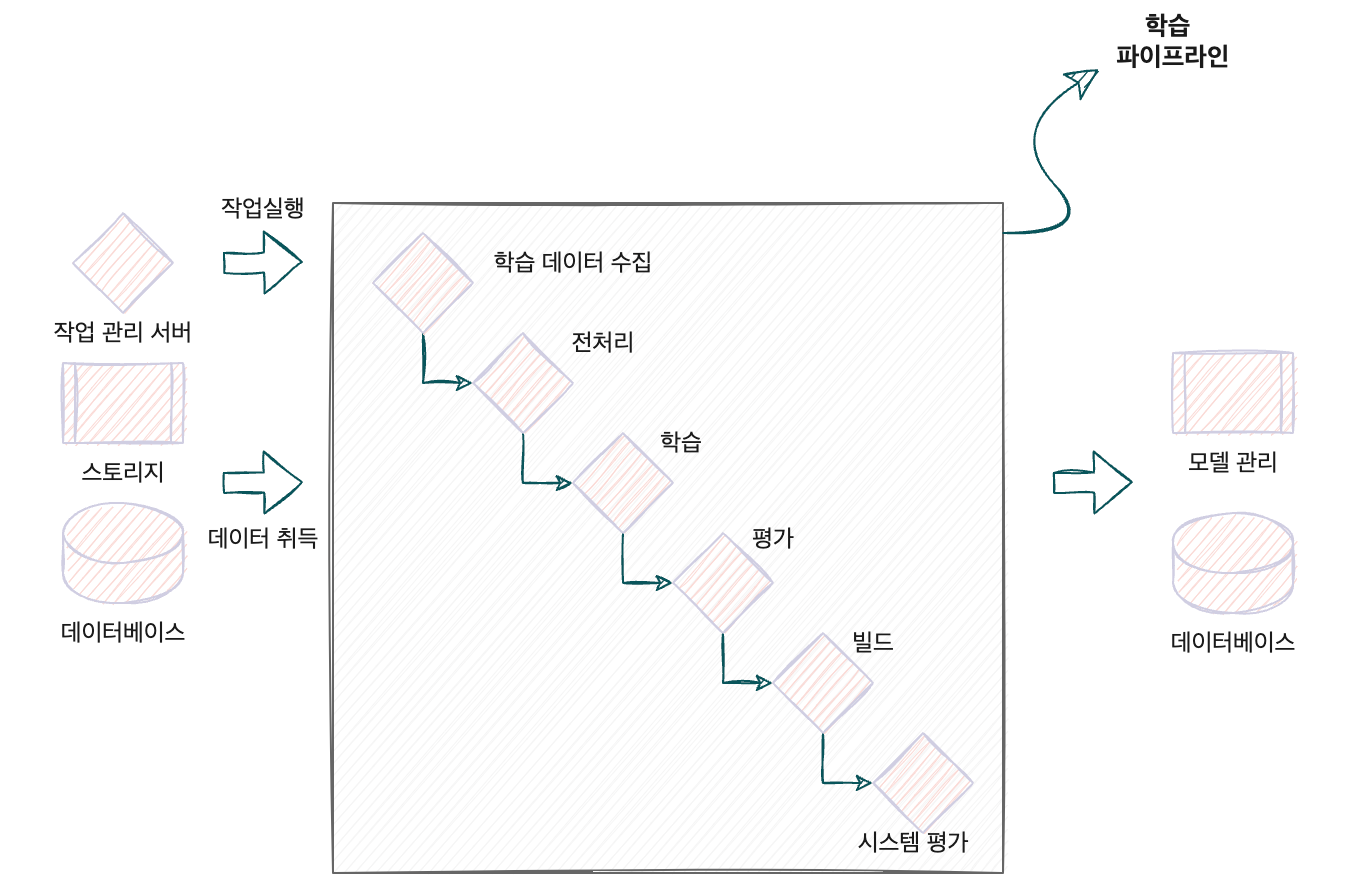
파이프라인 학습 패턴에서는 작업이 개별 리소스로 분할되기 때문에 의존성이 있는 작업을 실행한 이후에 다음 작업을 실행한다. 작업의 실행 결과는 후속 작업의 입력 데이터가 된다. 장애에 대응하기 위해 각 작업의 데이터를 매번 DWH(Data Ware House)나 스토리지에 저장할 수도 있다.
파이프라인 학습 패턴의 어려운 점은 개별 작업의 자원이나 코드 관리가 복잡해진다는 것이다. 각 작업의 독립성을 높이는 이점이 있는 반면, 작업의 실행 조건이나 자원 선택 등을 개별로 검토할 필요가 있다. 파이프라인이 복잡해지는 것을 피하기 위해 파이프라인을 대략 여섯 단계 이내의 프로세스로 구성하면 관리하기 쉽다.
구현
파이프라인 학습 패턴에서는 MLflow를 local에서 활용하여 ML 파이프라인을 구성하였다. ML파이프라인을 구축할 수 있는 툴은 Amazon SageMaker, Kubeflow 등 여러가지가 있지만 Mlflow는 빠르게 local 환경에서 파이프라인을 구성할 수 있다는 장점이 있다.
해당 ML 시스템에 활용될 데이터는 Cifar-10 데이터셋을 활용했고 10개의 클래스를 분류하는 Image classification model을 VGG-11 모델을 PyTorch로 작성하였다. 파이프라인에서는 아래 네 개의 스텝을 구현한다.
- 데이터 수집: 이미지 데이터를 가져와 로컬에 저장한다.
- 학습과 평가: 1에서 취득한 이미지를 VGG11 모델로 학습한다. 학습한 모델을 평가하고 Accuracy와 Loss를 기록한다.
- 빌드: 2에서 생성한 모델을 포함한 추론용 도커 이미지를 빌드한다.
- 시스템 평가: 3에서 생성한 도커 이미지를 가동하고 추론 요청을 보내 모델과 추론기의 접속을 테스트한다.
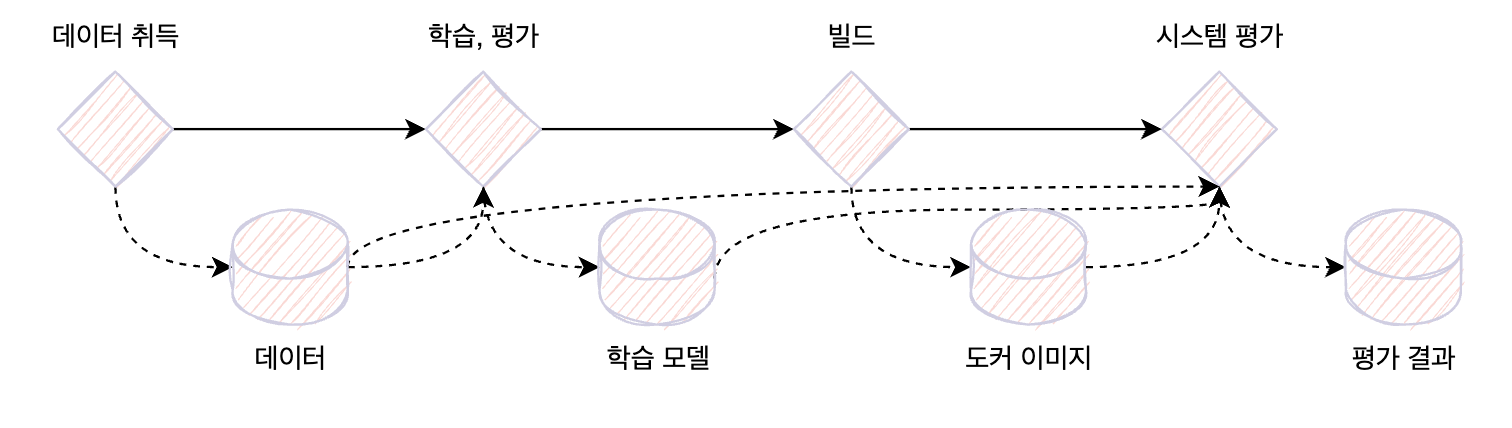
각 스텝은 도커 컨테이너에서 실행하고, 데이터는 MLflow의 artifact로 받아 전달한다. 여기서 artifact란 MLflow의 각 스텝에서 생성한 데이터와 파일을 의미한다. 아래 그림과 같이 후속 공정에서는 이전 component에서 생성한 artifact를 입력 데이터로 받아 학습과 평가를 실행하는 구조가 된다.
Dockerfile
FROM python:3.8-buster

ENV PROJECT_DIR /mlflow/projects
ENV CODE_DIR /mlflow/projects/code

WORKDIR /${PROJECT_DIR}
ADD requirements.txt /${PROJECT_DIR}/

RUN apt-get -y update && \
    apt-get -y install apt-utils gcc && \
    pip install --no-cache-dir -r requirements.txt

WORKDIR /${CODE_DIR}- 전처리, 학습, 평가 파이프라인은 해당 도커파일을 기반으로한 컨테이너로 실행된다.
- WORKDIR로 설정한 경로가 존재하지 않으면 새로 폴더를 생성한다.
MLproject
name: cifar10_initial

entry_points:
  main:
    parameters:
      preprocess_data: {type: string, default: cifar10}
      preprocess_downstream: {type: string, default: /opt/data/preprocess/}
      preprocess_cached_data_id: {type: string, default: ""}

      train_downstream: {type: string, default: /opt/data/model/}
      train_tensorboard: {type: string, default: /opt/data/tensorboard/}
      train_epochs: {type: int, default: 1}
      train_batch_size: {type: int, default: 32}
      train_num_workers: {type: int, default: 4}
      train_learning_rate: {type: float, default: 0.001}
      train_model_type: {type: string, default: vgg11}

      building_dockerfile_path: {type: string, default: ./Dockerfile}
      building_model_filename: {type: string, default: cifar10_0.onnx}
      building_entrypoint_path: {type: string, default: ./onnx_runtime_server_entrypoint.sh}

      evaluate_downstream: {type: string, default: ./evaluate/}
    command: |
      python -m main \
        --preprocess_data {preprocess_data} \
        --preprocess_downstream {preprocess_downstream} \
        --preprocess_cached_data_id {preprocess_cached_data_id} \
        --train_downstream {train_downstream} \
        --train_tensorboard {train_tensorboard} \
        --train_epochs {train_epochs} \
        --train_batch_size {train_batch_size} \
        --train_num_workers {train_num_workers} \
        --train_learning_rate {train_learning_rate} \
        --train_model_type {train_model_type} \
        --building_dockerfile_path {building_dockerfile_path} \
        --building_model_filename {building_model_filename} \
        --building_entrypoint_path {building_entrypoint_path} \
--evaluate_downstream {evaluate_downstream}- MLflow의 run명령어를 수행하기 위해 MLproject라는 이름의 파일이 필요하며 이 안에 해당 component에서 수행할 작업을 명시해준다.
- 이 MLproject 파일을 mlflow run 명령어로 실행시키면 main.py 파일을 설정한 파라미터로 실행하게 된다.
- 각 컴포넌트는 개별적인 컨테이너에서 실행되기 때문에 경로를 나타내는 파라미터의 default 값은 컨테이너 경로가 되어야 한다.
main.py
import argparse
import os
from turtle import back

import mlflow

from train.src.model import train


def main():
	'''생략'''
    args = parser.parse_args()
    mlflow_experiment_id = int(os.getenv("MLFLOW_EXPERIMNET_ID", 0))

    with mlflow.start_run() as f:
        preprocess_run = mlflow.run(
            uri="./preprocess",
            entry_point="preprocess",
            backend="local",
            parameters={
                "data": args.preprocess_data,
                "downstream": args.preprocess_downstream,
                "cached_data_id": args.preprocess_cached_data_id,
            },
        )
        preprocess_run = mlflow.tracking.MlflowClient().get_run(preprocess_run.run_id)


        dataset = os.path.join(
            "/tmp/mlruns/",
            str(mlflow_experiment_id),
            preprocess_run.info.run_id,
            "artifacts/downstream_directory",
        )

        train_run = mlflow.run(
            uri="./train",
            entry_point="train",
            backend="local",
            parameters={
                "upstream": dataset,
                "downstream": args.train_downstream,
                "tensorboard": args.train_tensorboard,
                "epochs": args.train_epochs,
                "batch_size": args.train_batch_size,
                "num_workers": args.train_num_workers,
                "learning_rate": args.train_learning_rate,
                "model_type": args.train_model_type,
            },
        )

        train_run = mlflow.tracking.MlflowClient().get_run(train_run.run_id)

        building_run = mlflow.run(
            uri="./building",
            entry_point="building",
            backend="local",
            parameters={
                "dockerfile_path": args.building_dockerfile_path,
                "model_filename": args.building_model_filename,
                "model_directory": os.path.join(
                    "mlruns/",
                    str(mlflow_experiment_id),
                    train_run.info.run_id,
                    "artifacts",
                ),
                "entrypoint_path": args.building_entrypoint_path,
                "dockerimage": f"tjems6498/ml-system-in-actions:training_pattern_cifar10_evaluate_{mlflow_experiment_id}",
            },
        )
        building_run = mlflow.tracking.MlflowClient().get_run(building_run.run_id)

        evaluate_run = mlflow.run(
            uri="./evaluate",
            entry_point="evaluate",
            backend="local",
            parameters={
                "upstream": os.path.join(
                    "mlruns/",
                    str(mlflow_experiment_id),
                    "65aad9ee1f004cf89fad16d9e3a5a2ca", # train_run.info.run_id,
                    "artifacts",
                ),
                "downstream": args.evaluate_downstream,
                "test_data_directory": os.path.join(
                    "mlruns/",
                    str(mlflow_experiment_id),
                    "c069f89baaea445fa43a14afbcc921da", #preprocess_run.info.run_id,
                    "artifacts/downstream_directory/test",
                ),
                "dockerimage": f"tjems6498/ml-system-in-actions:training_pattern_cifar10_evaluate_{mlflow_experiment_id}",
                "container_name": f"training_pattern_cifar10_evaluate_{mlflow_experiment_id}",
            },
        )
        evaluate_run = mlflow.tracking.MlflowClient().get_run(evaluate_run.run_id)


if __name__ == "__main__":
main()- main.py가 실행되면 preprocess, train, building, evaluate 총 4개의 mlflow run이 순차적으로 실행된다.
preprocess/MLproject
name: cifar10_initial

docker_env:
  image: tjems6498/ml-system-in-actions:training_pattern_cifar10_0.0.1
  volumes: ["$(pwd)/data:/opt/data", "/home/kubwa-ai/jeff/MLOps-DP/model_training/pipeline_train_patterns/mlruns:/tmp/mlruns"]

entry_points:
  preprocess:
    parameters:
      data: {type: string, default: cifar10}
      downstream: {type: string, default: /opt/data/preprocess/}
      cached_data_id: {type: string, default: ""}
    command: |
      python -m src.preprocess \
        --data {data} \
        --downstream {downstream} \
--cached_data_id {cached_data_id}- 먼저 preprocess component에서는 위 도커파일로 생성된 이미지를 활용하여 preprocess/src/preprocess.py 파일을 설정한 파라미터로 실행시킨다.
- preprocess 컴포넌트에서 생성되는 데이터는 다른 컴포넌트에서도 사용되기 때문에 volume을 활용한다.
preprocess/src/preprocess.py
import argparse
import json
import os
from distutils.dir_util import copy_tree

import mlflow
import torchvision
from src.configurations import PreprocessConfigurations
from src.extract_data import parse_pickle, unpickle


def main():
	'''생략'''
        os.makedirs(downstream_directory, exist_ok=True)
        os.makedirs(train_output_destination, exist_ok=True)
        os.makedirs(test_output_destination, exist_ok=True)
        os.makedirs(cifar10_directory, exist_ok=True)

        torchvision.datasets.CIFAR10(
            root=downstream_directory,
            train=True,
            download=True,
        )
        torchvision.datasets.CIFAR10(
            root=downstream_directory,
            train=False,
            download=True,
        )

        meta_train = {i: [] for i in range(10)}
        meta_test = {i: [] for i in range(10)}

        for f in PreprocessConfigurations.train_files:
            rawdata = unpickle(file=os.path.join(cifar10_directory, f))
            class_to_filename = parse_pickle(
                rawdata=rawdata,
                rootdir=train_output_destination,
            )
            for cf in class_to_filename:
                meta_train[int(cf[0])].append(cf[1])

        for f in PreprocessConfigurations.test_files:
            rawdata = unpickle(file=os.path.join(cifar10_directory, f))
            class_to_filename = parse_pickle(
                rawdata=rawdata,
                rootdir=test_output_destination,
            )
            for cf in class_to_filename:
                meta_test[int(cf[0])].append(cf[1])

        classes_filepath = os.path.join(
            downstream_directory,
            "classes.json",
        )
        meta_train_filepath = os.path.join(
            downstream_directory,
            "meta_train.json",
        )
        meta_test_filepath = os.path.join(
            downstream_directory,
            "meta_test.json",
        )
        with open(classes_filepath, "w") as f:
            json.dump(PreprocessConfigurations.classes, f)
        with open(meta_train_filepath, "w") as f:
            json.dump(meta_train, f)
        with open(meta_test_filepath, "w") as f:
            json.dump(meta_test, f)

    mlflow.log_artifacts(
        downstream_directory,
        artifact_path="downstream_directory",
    )


if __name__ == "__main__":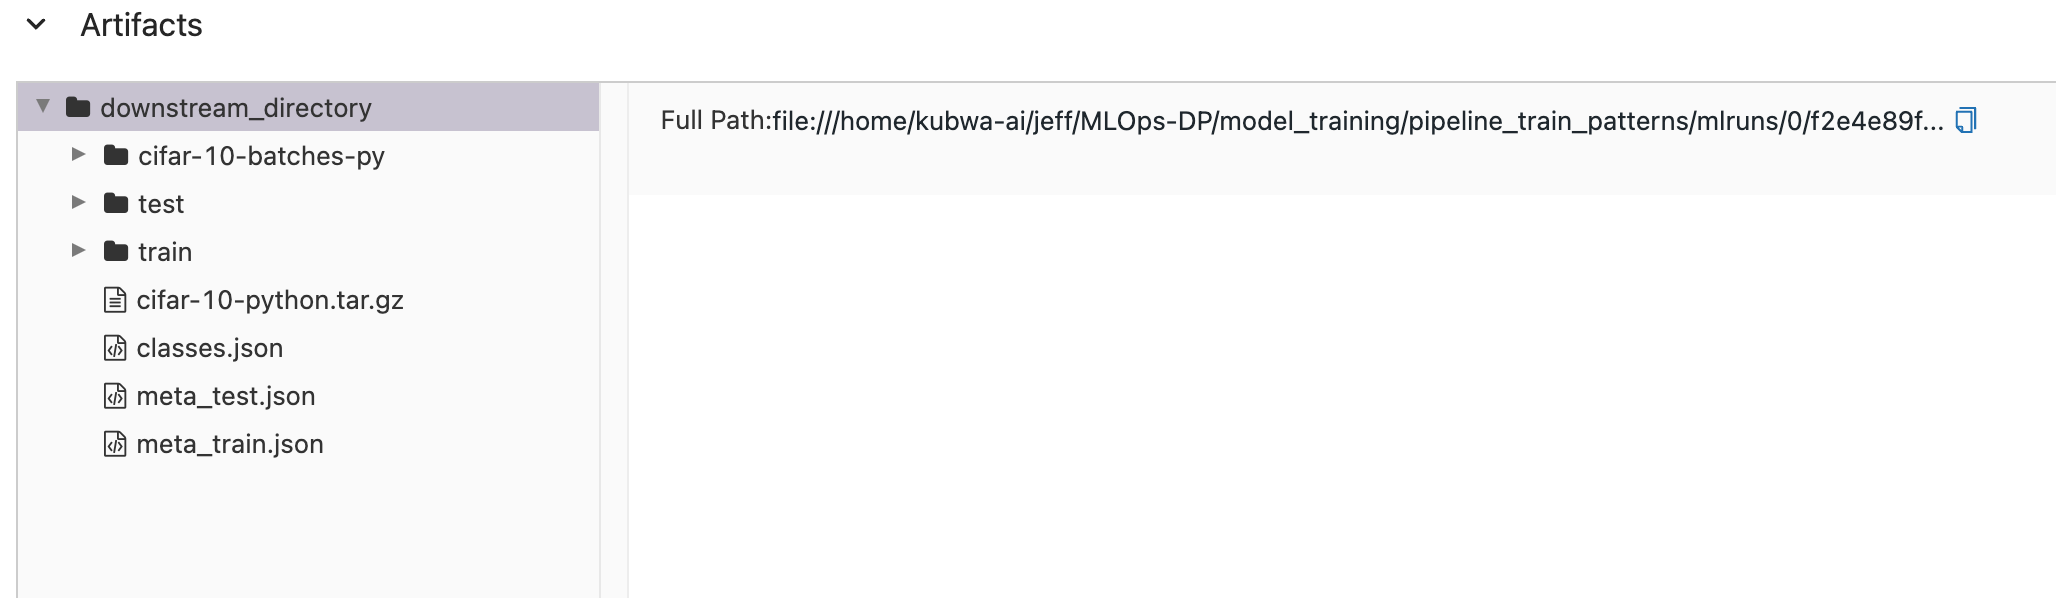
main()- 해당 파일에서는 cifar10 데이터셋, 클래스 정보, 데이터 split 에 대한 정보를 저장하며 이를 artifact로 남기는 작업을 수행한다.
- MLproject에서 volume을 설정했기 때문에 로컬 경로의 preprocess/data 와 artifact 경로인 mlruns/{experiment_id}/{run_id}/artifact/downstream_directory 에 데이터가 공유된다.
train/MLproject
name: cifar10_initial

docker_env:
  image: tjems6498/ml-system-in-actions:training_pattern_cifar10_0.0.1
  volumes: ["$(pwd)/data:/opt/data", "/home/kubwa-ai/jeff/MLOps-DP/model_training/pipeline_train_patterns/mlruns:/tmp/mlruns"]

entry_points:
  train:
    parameters:
      upstream: {type: string, default: ""}
      downstream: {type: string, default: /opt/data/model/}
      tensorboard: {type: string, default: /opt/data/tensorboard/}
      epochs: {type: int, default: 1}
      batch_size: {type: int, default: 32}
      num_workers: {type: int, default: 4}
      learning_rate: {type: float, default: 0.001}
      model_type: {type: string, default: vgg16}
    command: |
      python -m src.train \
        --upstream {upstream} \
        --downstream {downstream} \
        --tensorboard {tensorboard} \
        --epochs {epochs} \
        --batch_size {batch_size} \
        --num_workers {num_workers} \
        --learning_rate {learning_rate} \
--model_type {model_type}- train 컴포넌트에서는 preprocess 컴포넌트의 output artifact를 활용해야하기 때문에 preprocess 컴포넌트와 마찬가지로 같은 이미지, 같은 볼륨을 활용한다.
- parameter에서 upstream은 input artifact 경로이며 downstream은 output artifact 경로이다. 여기서 upstream의 default값이 비어있는 이유는 해쉬값으로 지정되는 run_id를 현재 파일에서는 알 수 없기 때문이다. 그래서 main.py 파일의 135번째 줄에서 preprocess_run의 run_id를 train의 upstream 파라미터로 활용한다.
train/src/train.py
import argparse
import logging
import os

import mlflow
import mlflow.pytorch
import torch
import torch.nn as nn
import torch.optim as optim
from src.constants import MODEL_ENUM
from src.model import VGG11, VGG16, Cifar10Dataset, SimpleModel, evaluate, train
from torch.utils.data import DataLoader
from torch.utils.tensorboard import SummaryWriter
from torchvision import transforms

logging.basicConfig(level=logging.INFO)
logger = logging.getLogger(__name__)


def start_run(
    mlflow_experiment_id: str,
    upstream_directory: str,
    downstream_directory: str,
    tensorboard_directory: str,
    batch_size: int,
    num_workers: int,
    epochs: int,
    learning_rate: float,
    model_type: str,
):
  	'''생략'''
    train(
        model=model,
        train_dataloader=train_dataloader,
        test_dataloader=test_dataloader,
        criterion=criterion,
        optimizer=optimizer,
        epochs=epochs,
        writer=writer,
        checkpoints_directory=downstream_directory,
        device=device,
    )

    accuracy, loss = evaluate(
        model=model,
        test_dataloader=test_dataloader,
        criterion=criterion,
        writer=writer,
        epoch=epochs + 1,
        device=device,
    )
    logger.info(f"Latest performance: Accuracy: {accuracy}, Loss: {loss}")

    writer.close()

    model_file_name = os.path.join(
        downstream_directory,
        f"cifar10_{mlflow_experiment_id}.pth",
    )
    onnx_file_name = os.path.join(
        downstream_directory,
        f"cifar10_{mlflow_experiment_id}.onnx",
    )

    torch.save(model.state_dict(), model_file_name)

    dummy_input = torch.randn(1, 3, 32, 32)
    torch.onnx.export(
        model,
        dummy_input,
        onnx_file_name,
        verbose=True,
        input_names=["input"],
        output_names=["output"],
    )

    mlflow.log_param("optimizer", "Adam")
    mlflow.log_param(
        "preprocess",
        "Normalize((0.4914, 0.4822, 0.4465), (0.2023, 0.1994, 0.2010))",
    )
    mlflow.log_param("epochs", epochs)
    mlflow.log_param("learning_rate", learning_rate)
    mlflow.log_param("batch_size", batch_size)
    mlflow.log_param("num_workers", num_workers)
    mlflow.log_param("device", device)
    mlflow.log_metric("accuracy", accuracy)
    mlflow.log_metric("loss", loss)
    mlflow.log_artifact(model_file_name)
    mlflow.log_artifact(onnx_file_name)
    mlflow.log_artifacts(tensorboard_directory, artifact_path="tensorboard")


def main():
    '''생략'''
    args = parser.parse_args()
    mlflow_experiment_id = int(os.getenv("MLFLOW_EXPERIMENT_ID", 0))

    upstream_directory = args.upstream
    downstream_directory = args.downstream
    tensorboard_directory = args.tensorboard
    os.makedirs(downstream_directory, exist_ok=True)
    os.makedirs(tensorboard_directory, exist_ok=True)

    start_run(
        mlflow_experiment_id=mlflow_experiment_id,
        upstream_directory=upstream_directory,
        downstream_directory=downstream_directory,
        tensorboard_directory=tensorboard_directory,
        batch_size=args.batch_size,
        num_workers=args.num_workers,
        epochs=args.epochs,
        learning_rate=args.learning_rate,
        model_type=args.model_type,
    )


if __name__ == "__main__":
main()- train.py 파일에서는 모델을 학습하고 학습로그, torch파일, onnx파일을 artifact로 남기는 역할을 한다.
- preprocess와 마찬가지로 로컬의 train/data 폴더와 mlruns/{experiment_id}/{run_id}/artifact 폴더에 artifact가 저장된다.
building/MLproject
name: cifar10_initial

conda_env: conda.yml

entry_points:
  building:
    parameters:
      dockerfile_path: {type: string, default: ./Dockerfile}
      model_filename: {type: string, default: cifar10_0.onnx}
      model_directory: {type: string, default: ""}
      entrypoint_path: {type: string, default: ./onnx_runtime_server_entrypoint.sh}
      dockerimage: {type: string, default: "tjems6498/ml-system-in-actions:training_pattern_cifar10_evaluate_0.0.1"}
    command: |
      cp ../{model_directory}/{model_filename} ./ && \
      docker build \
        -t {dockerimage} \
        -f {dockerfile_path} \
        --build-arg model_filename={model_filename} \
        --build-arg entrypoint_path={entrypoint_path} \
.- building 컴포넌트에서는 artifact에 저장된 onnx 모델파일을 build 폴더경로로 복사한 후 도커이미지를 build하는 역할을 수행한다.
- 이전 MLproject 파일과 다르게 docker_env가 conda_env라는 항목으로 변경되었는데 이는 docker build 명령어를 container에서 빌드하려면 docker in docker 방식을 사용해야 하기 때문에 간편하게 로컬의 docker를 활용하기 위해 conda 환경에서 컴포넌트를 실행하기 위해 변경되었다.
building/Dockerfile
FROM mcr.microsoft.com/onnxruntime/server:latest

ARG model_filename=cifar10_0.onnx

ARG entrypoint_path=./building/onnx_runtime_server_entrypoint.sh

ENV PROJECT_DIR cifar10

WORKDIR /${PROJECT_DIR}

COPY ./${model_filename} /${PROJECT_DIR}/${model_filename}

ENV MODEL_PATH /${PROJECT_DIR}/${model_filename}

WORKDIR /onnxruntime/server/
COPY ./${entrypoint_path} ./onnx_runtime_server_entrypoint.sh
RUN chmod +x onnx_runtime_server_entrypoint.sh
ENTRYPOINT ["./onnx_runtime_server_entrypoint.sh"]- 해당 Dockerfile은 시스템 평가(evaluate) 컴포넌트에서 실행할 컨테이너의 이미지 정보이다.
- ARG는 도커파일 안에서만 사용되는 환경변수이며 command와 비슷하게 build시에 파라미터를 변경할 수 있다.
- 모델인 이미지 방식이기 때문에 COPY 명령어로 onnx파일을 컨테이너에 포함시킨다.
- 모델은 onnx runtime으로 배포하기 때문에 base이미지를 onnx runtime server로 설정했고 최종적으로 onnx_runtime_server_entrypoint.sh 파일을 실행한다.
building/onnx_runtime_server_entrypoint.sh
#!/bin/bash

set -eu

HTTP_PORT=${HTTP_PORT:-8001}
GRPC_PORT=${GRPC_PORT:-50051}
LOGLEVEL=${LOGLEVEL:-"debug"}
NUM_HTTP_THREADS=${NUM_HTTP_THREADS:-4}
MODEL_PATH=${MODEL_PATH:-"/cifar10/cifar10_0.onnx"}

./onnxruntime_server \
    --http_port=${HTTP_PORT} \
    --grpc_port=${GRPC_PORT} \
    --num_http_threads=${NUM_HTTP_THREADS} \
--model_path=${MODEL_PATH}- 위 도커파일에서 MODEL_PATH 환경변수를 등록했기 때문에 모델 경로를 찾을수 있으며 나머지 환경변수는 default값을 사용한다.
evaluate/MLproject
name: cifar10_initial

conda_env: conda.yml

entry_points:
  evaluate:
    parameters:
      upstream: {type: string, default: ""}
      downstream: {type: string, default: /opt/data/evaluate/}
      test_data_directory: {type: string, default: /opt/data/preprocess/test}
      dockerimage: {type: string, default: "tjems6498/ml-system-in-actions:training_pattern_cifar10_evaluate_0.0.1"}
      container_name: {type: string, default: test}
    command: |
      docker run \
        -it -d \
        --name {container_name} \
        -p 50051:50051 {dockerimage} && \
      python -m src.evaluate \
        --upstream {upstream} \
        --downstream {downstream} \
--test_data_directory {test_data_directory}- evaluate 컴포넌트는 building 컴포넌트에서 빌드한 onnxruntime server를 docker run 명령어로 컨테이너를 실행시키고 서버 엔드포인트로 평가를 진행하는 evaluate/src/evaluate.py를 실행한다.
- building 컴포넌트와 마찬가지로 docker 명령어를 사용하기 때문에 컴포넌트 실행 환경을 conda environment로 대체한다.
evaluate/src/evaluate.py
import argparse
import json
import logging
import os
import time
from typing import Dict, List, Tuple, Union

import grpc
import mlflow
import numpy as np
from PIL import Image
from sklearn.base import BaseEstimator, TransformerMixin
from sklearn.metrics import accuracy_score
from src.proto import onnx_ml_pb2, predict_pb2, prediction_service_pb2_grpc

logging.basicConfig(level=logging.INFO)
logger = logging.getLogger(__name__)

'''생략'''

def main():
    '''생략'''
    args = parser.parse_args()
    mlflow_experiment_id = int(os.getenv("MLFLOW_EXPERIMENT_ID", 0))

    upstream_directory = args.upstream
    downstream_directory = args.downstream
    os.makedirs(upstream_directory, exist_ok=True)
    os.makedirs(downstream_directory, exist_ok=True)

    result = evaluate(
        test_data_directory=args.test_data_directory,
    )

    log_file = os.path.join(downstream_directory, f"{mlflow_experiment_id}.json")
    with open(log_file, "w") as f:
        json.dump(log_file, f)

    mlflow.log_metric(
        "total_tested",
        result["evaluation"]["total_tested"],
    )
    mlflow.log_metric(
        "total_time",
        result["evaluation"]["total_time"],
    )
    mlflow.log_metric(
        "accuracy",
        result["evaluation"]["accuracy"],
    )
    mlflow.log_metric(
        "average_duration_second",
        result["evaluation"]["average_duration_second"],
    )
    mlflow.log_artifact(log_file)


if __name__ == "__main__":
main()- evaluate.py에서는 추론 결과의 Accuracy와 latency를 평가한다. builder 컴포넌트에서 작성한 도커 이미지를 추론기로써 기동하고, 추론기로 요청을 보내서 추론 결과와 추론 소요 시간을 측정한다. 평가에 사용되는 데이터는 preprocess 컴포넌트에서 생성한 test dataset을 활용한다.
이로써 구현은 끝났으니 파이프라인을 실행해보자.
docker build \
		-t tjems6498/ml-system-in-actions:training_pattern_cifar10_0.0.1 \
		-f Dockerfile .

mlflow run .
MLflow는 mlflow ui 명령어로 대시보드에서 실험및 모델을 관리할 수 있다. 기본적으로 localhost:5000가 열리게되는데 접속을 하게되면 아래와 같은 화면이 나오게 된다.

- 현재 main.py의 하나의 실험 안에 4개의 컴포넌트(preprocess, train, builder, evaluate)가 존재하기 때문에 파이프라인 실행이 완료되면 위와같이 총 5개의 run이 생성된다.
- preprocess run을 클릭해서 Artifacts를 확인해보면 preprocess 컴포넌트가 실행된 후 로컬 mlruns 폴더에 생성되었던 artifact를 확인할 수 있다.
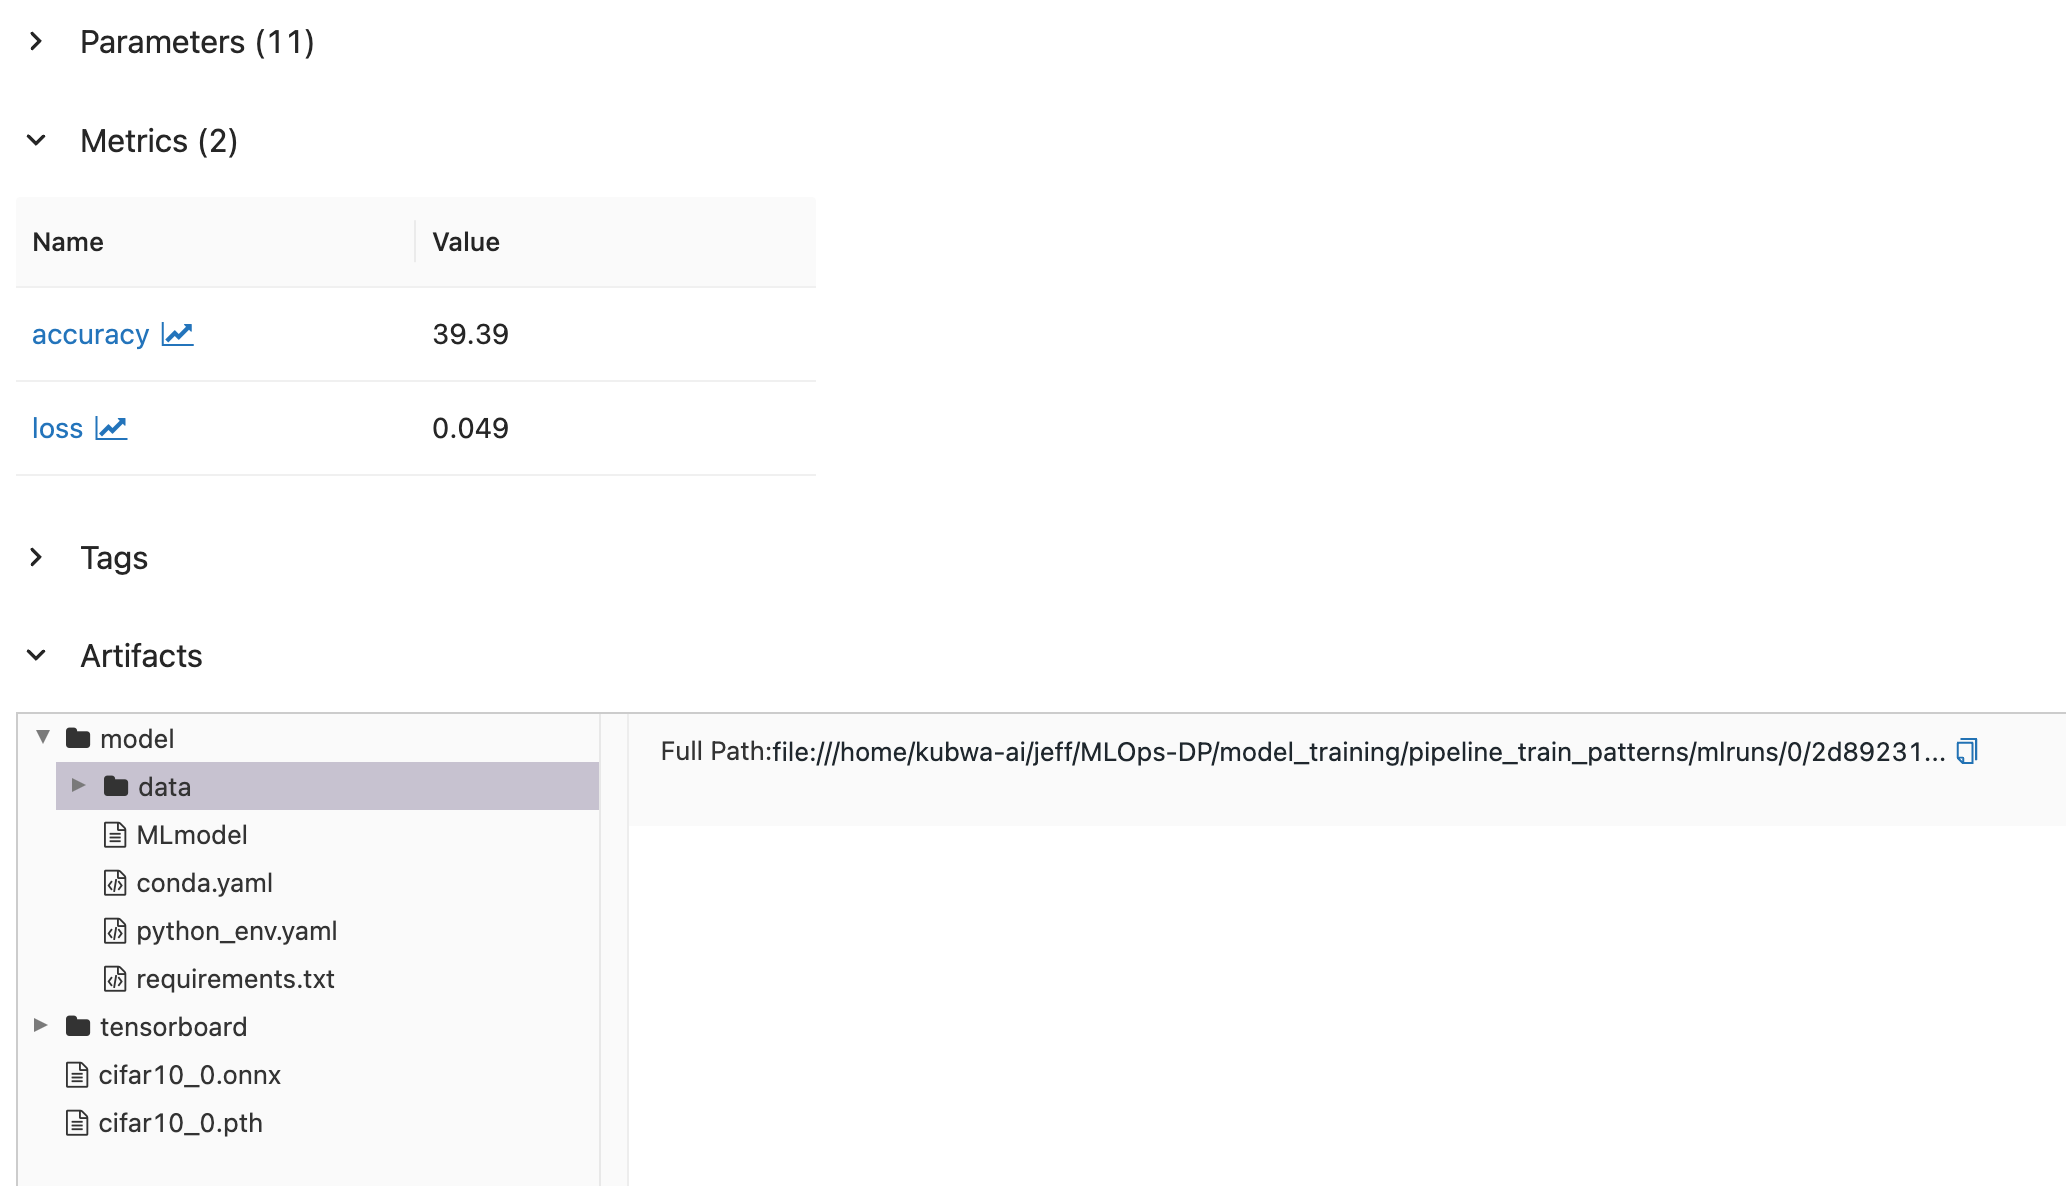
- 마찬가지로 train run 항목을 클릭해보면 train.py에서 log로 남긴 Parameters, Metrics, Artifacts가 저장된 것을 볼 수 있다.

- 추론기의 평가에 사용된 Parameters와 결과인 Metrics도 잘 저장된 것을 확인할 수 있다.
이상으로 데이터를 취득해서 머신러닝을 통해 분류 모델을 학습하고 모델을 추론기로 가동, 평가할 수 있게 되었다. 머신러닝 개발 프로세스를 파이프라인으로 정의하면 각 단계를 일괄적으로 실행할 수 있으며 그 기록 또한 단계별로 관리할 수 있다.
이점
- 작업이 소모하는 자원이나 라이브러리 선정 등이 유연하다.
- 에러가 발생한 부분을 작업별로 분리하기 쉽다.
- 워크로드 및 데이터에 따른 유연한 작업 관리가 가능하다.
검토사항
파이프라인에서는 전처리, 학습, 평가, 빌드, 시스템 평가마다 개별 작업을 기동함과 동시에 자원을 확보한다. 이때 개별 작업이 완료될 때 마다 자원을 반환하는 것이 좋다. 비즈니스에 소요되는 예산은 한정되어 있기 때문에 GPU서버를 학습시에만 가동하거나 모델을 경량화 시키는 등 여러 판단을 해볼 수 있다.
학습 파이프라인에서 사용하는 OS, 언어, 라이브러리 버전은 반드시 기록해야 한다. 이 정보들은 추론 과정에서도 필요하기 때문에 이를 관리하는 것이 좋다. 그렇지 않으면 모델 파일은 가지고 있지만, 추론기에 포함할 수 없게 되는 등의 사태가 발생할 위험이 있다.
2. 배치 학습 패턴
Use Case
- 정기적인 배치 단위로 모델 학습을 실행하고 싶은 경우
해결하려는 과제
머신러닝 모델은 대부분의 경우 학습한 직후에 추론한 결과가 가장 정확하지만, 시간이 흐르면서 데이터의 변화로 인해 정확도는 점차 떨어지는 모습을 보인다. 따라서 최신 데이터로 다시 학습하면 이와 같은 모델의 성능 저하를 늦출 수 있다.
특정 계절이나 시기에 최적화된 모델이 학습된 경우나 최신 데이터의 경향을 반영하도록 학습하는 것이 중요한 비즈니스의 경우, 매번 수동으로 학습을 실행하는 것은 비효율적이다. 이 때는 모델의 알고리즘을 자주 변경할 필요가 없는 한 정기적인 배치 단위로 학습을 실행하는 것이 현명하다.
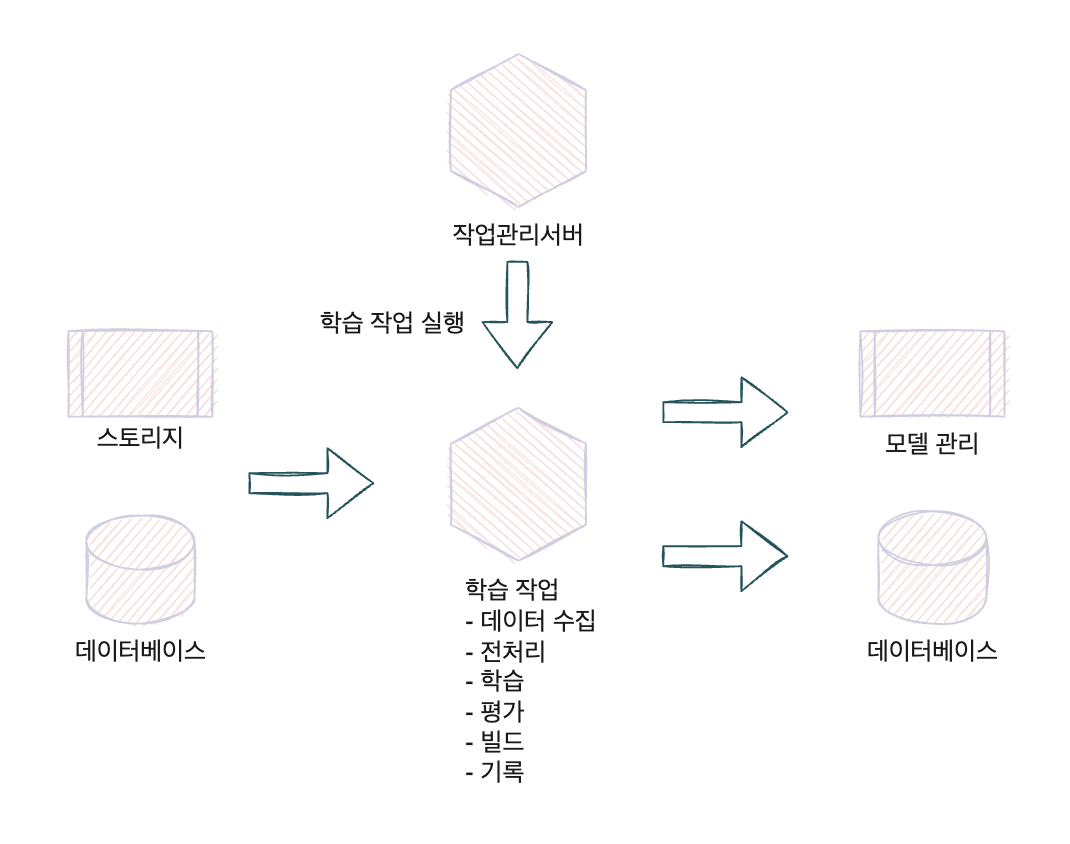
Architecture
머신러닝 모델을 정기적으로 갱신하고 싶은 경우에는 배치 학습 패턴이 유용하다, 학습을 작업으로 정의한 다은 스케줄링 시스템(cron)이나 작업 관리 서버에 작업의 실행 조건(일시, 데이터량, 이용량 등)을 등록하고 실행할 수 있다. 간단하게 구성한다면 리눅스에서 cron을 사용할 수 있고 쿠버네티스 환경의 cron, cronjob, 각종 클라우드가 제공하는 정기 실행 서비스를 활용해도 된다.
배치 학습 패턴은 모델의 학습을 자동화 할 때 가장 전형적인 패턴이며, architecture는 아래와 같다.
구현
배치 학습 패턴은 위 파이프라인 학습 패턴의 train 컴포넌트를 cron으로 정기 실행하는 방식으로 진행한다.
run_train.sh
#!/bin/bash

set -eu

mlflow run .- 위 파일을 train/MLproject 파일 경로에 추가하여 실행하면 train 컴포넌트만 개별적으로 실행하는 run이 생성된다.
command
* 0 * * * cd ./train ./run_train.sh- 리눅스 cronjob 명령어는 minute(s) hour(s) day(s) month(s) weekday(s) command(s) 순으로 설정된다.
- 위 커맨드를 실행하면 매일 0시에 학습작업을 실행하게 되며 실행 결과는 모델 관리 서비스 및 MLflow의 로그에 기록되므로 학습 완료 후 확인할 수 있다.
이점
- 정기적으로 모델을 학습하고 갱신이 가능함
검토사항
일반적인 머신러닝 학습 파이프라인은 다음과 같은 작업이 포함된다.
- DWH(데이터 웨어하우스) 등에서 데이터 수집
- 데이터 전처리
- 학습
- 평가
- 모델 및 추론기의 빌드
- 모델, 추론기, 평가의 기록
만약 추론 모델을 항상 최신으로 유지할 필요가 있는 경우, 에러가 발생하면 재시도하거나 운용자에게 통보해야한다. 항상 최신일 필요가 없다면 에러반 통보해 두고 나중에 수동으로 다시 실행하면 된다.
에러가 발생하면 해당 부분의 로그를 남겨서 트러블슈팅과 복구를 할 수 있게 대책을 세워야 한다. 위의 작업 플로우 중 1번에서 오류가 발생했다면 DWH나 입력 데이터가 불량일 가능성이 있기 때문에 DWH 관리나 데이터의 이상 진단 또는 이상치 검출 등을 시도해 보는 것이 타당하다. 비정상 데이터를 포함하고 있어서 작업이 멈춘 것이라면 자동 재시도로 대응하는것은 불가능하기 때문에 사전에 이상치를 제외하는 방식을 구현하거나 매뉴얼을 통해 예외적으로 대응하는 방식이 필요하다.
한편 모델의 성능이 요구되는 서비스 수준을 충족하지 못한다면 2~4번 작업에 대한 문제를 생각할 수 있다. 이때는 전처리 방법이나 하이퍼파라미터의 설정이 현 시점의 데이터에 적합하기 않을 가능성이 있기 때문에 데이터 분석과 모델의 튜닝이 필요하다.
5번과 6번 작업은 빌드 에러나 로그 에러 등 시스템 장애에 기인하는 경우를 생각할 수 있다. 빌드나 로깅에 사용하고 있는 시스템(서버, 스토리지, DB, 네트워크, 미들웨어, 라이브러리 등)의 장애 리포트를 확인할 필요가 있다.
END
이번 포스팅에서는 파이프라인 패턴과 배치 패턴을 통해 머신러닝 시스템의 각 작업을 컴포넌트로 분리하고 배치 단위로 자동화 하는 방법과 이점에 대해 알아보았다.
파이프라인을 엔지니어의 마음대로 세분화하여 더 다양한 처리를 실행할 수도 있지만 복잡한 시스템이 되어버려 파이프라인의 운용이나 트러블슈팅이 굉장히 어려워진다. 학습 단계에서 이뤄지는 개발은 파이프라인의 프로그램뿐만 아니라, 데이터에도 의존한다. 결국 데이터가 달라지면 파이프라인도 변경해야 하므로 복잡한 파이프라인을 만들수록 변화에 대응하기 위해 공수가 커지는데, 이러한 사태는 피하는것이 좋을 것이다.
또한 데이터가 여러가지 데이터 스토어(RDB, NoSQL, NAS, 웹 API, 클라우드, Hadoop 등)에 저장되어 있다면 이들과의 접근 방법이나 인증 인가는 따로 정해져 있을 것이다. 각 데이터 스토어로의 접근을 추상화하는 라이브러리를 사용하는것이 권장되지만, 데이터가 흩어져 있는 상태는 데이터 엔지니어에게 악영향을 주기 때문에 적절한 DWH를 선택해 데이터를 정리해두는것이 매우 중요하다.
다음 포스팅에서는 본격적으로 모델 릴리스과정에서의 2가지 패턴에 대해 정리 할 것이다.
keep going.
Reference
Book: AI 엔지니어를 위한 머신러닝 시스템 디자인 패턴
Open Source Code: https://github.com/wikibook/mlsdp/tree/main/chapter2_training/cifar10
My Code: https://github.com/tjems6498/MLOps-DP/tree/main/model_training/pipeline_train_patterns
Keep going
'MLOps' 카테고리의 다른 글
| [ML Design Pattern] 모델 릴리스 / 2.모델 로드 패턴 (1) | 2022.10.01 |
|---|---|
| [ML Design Pattern] 모델 릴리스 / 1. 모델 인 이미지 패턴 (0) | 2022.09.27 |
| [ML Design Pattern] 모델 생성 / 1. 프로젝트, 모델, 버저닝 관리 (0) | 2022.09.07 |
| [ML Design Pattern] 0. Back to the basic (0) | 2022.09.06 |
| Deploy with BentoML Yatai (1) | 2022.07.19 |