이번 포스팅에서는 OpenVINO라는 가속화 toolkit을 알아보고 Image classification 코드를 통해 기존 inference와 비교를 해보려고 한다.
OpenVINO?
OpenVINO를 짧게 표현한다면 '딥러닝 모델을 최적화 하여 Inference time을 끌어 올릴 수 있는 toolkit' 이라고 정리할 수 있을 것 같다.
컴퓨터 비전 분야에서 최종적으로 모델을 edge device로 올려야 하는 경우가 많다. 하지만 학습할때 사용했던 좋은 여러 GPU를 edge device의 inference에서도 사용한다는 것은 상당히 제한적이기 때문에 CPU, FPGA,1 GPU와 같이 edge device의 상황에 맞게 칩을 선택하게 된다. 그렇게 된다면 생각했던 것보다 Inference Time이 느려지게 되어 목표에 차질이 생길수도 있을 것이다.
이러한 문제를 해결하기 위한 Accererate Inference Toolkit에는 대표적으로 OpenCV inference engine, OpenVINO, TensorRT, ONNX Runtime등이 있는데 보편적인 Intel CPU를 통한 가속화를 하기 위해 필자는 OpenVINO를 활용하고 있다. (참고로 OpenVINO는 Intel에서 만들었기 때문에 Intel사의 CPU, GPU, FPGA 환경에서만 작동한다.)
How it works?
앞서 OpenVINO는 딥러닝 모델을 '최적화' 한다고 하였다. 여기서 '최적화' 는 무엇을 의미할까?
OpenVINO는 Tensorflow의 .pb,PyTorch의 .pt 파일과 같은 일반적인 딥러닝 모델을 Model Optimizer를 통해 Intermediate Representation(이하 IR) file인 .xml과 .bin 으로 모델 파일을 새롭게 만들어 낸다.
- .xml - Describes the network topology
- .bin - Contains the weights and biases binary data.
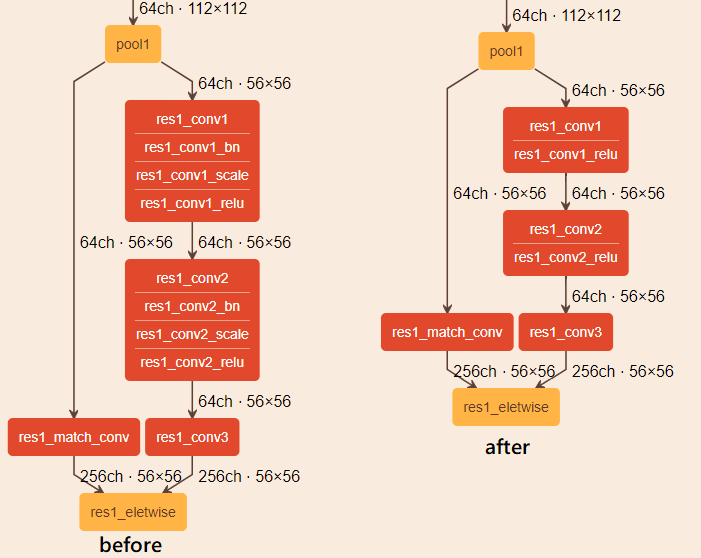
빠른 이해를 돕기 위해 OpenVINO의 공식 문서에서 이미지를 가져왔다. 위 이미지는 ResNet의 일부분 이며 왼쪽은 일반적인 모델의 레이어이며 오른쪽은 IR file로 변환된 모델의 레이어 이다.
OpenVINO의 Model Optimizer는 레이어 그룹을 하나의 수학 연산으로 표현하여 단일레이어로 표현할 수 있는지 판단하고 적용하게 된다. 좀 더 자세히 설명하자면 그림에서 Batch Normalization, Scaling은 Mul, Add연산이 각각 필요하게 되고 이 두개의 레이어 sequence를 merge시켜 하나의 연산으로 만든 후 주변의 Convolution 혹은 FC layer와 fusion시켜 1개의 레이어로 응축을 시킨다는 것이다.
또한 Dropout과 같이 학습에만 필요한 레이어가 있다면 Model Optimizer는 이 레이어를 자동으로 제거하여 IR로 추출해 낸다.
How to use?
OpenVINO를 사용하기 위해서는 먼저 Toolkit을 설치해야 한다. (설치 방법은 포스팅 맨 아래 참조 사이트에 첨부) 설치는 간단하기 때문에 넘어가고 바로 코드를 통해 활용법을 알아보자.
Environment
OS: Mac osx
Processor : 2.6 GHz 6코어 Intel Core i7
Model: Resnet 18
Image: ImageNet sample data
Framework: PyTorch
1. .pt to onnx
PyTorch 모델은 OpenVINO를 사용하기 전에 먼저 onnx 파일로 변환을 해야한다. onnx는 open neural network exchange의 약어로 딥러닝 프레임워크간 모델 형식을 변환하는데 주로 사용한다.
import torch
import timm

model = timm.create_model('resnet18', pretrained=False)
model.load_state_dict(torch.load('resnet18.pt', map_location=torch.device('cpu')))
model.eval()

# make dummy data
batch_size = 1
# model input size에 맞게 b c h w 순으로 파라미터 설정
x = torch.rand(batch_size, 3, 224, 224, requires_grad=True).to('cpu')
# feed-forward test
output = model(x)
# convert
torch.onnx.export(model, x, "resnet18.onnx", export_params=True,
                  opset_version=10, do_constant_folding=True,
                  input_names=['input'], output_names=['output'],
                  )
2. Model Optimizer
source /opt/intel/openvino_2021/bin/setupvars.sh
python /opt/intel/openvino_2021/deployment_tools/model_optimizer/mo.py --input_model resnet18.onnx --model_name resnet18 -s 255 --reverse_input_channels --input_shape '[1, 3, 224, 224]'- 위 코드는 터미널에서 실행하는 코드로 첫번째 라인은 OpenVINO Initialize에 사용되며 항상 처음에 실행되어야 한다.
- 두번째 라인은 OpenVINO설치를 하면서 다운받은 Model Optimizer 파이썬 파일을 실행하는 코드로 굉장히 많은 파라미터를 받을 수 있다. 자세한 내용은 글 아래 reference를 통해 확인할 수 있으며 작성한 파라미터에 대한 설명을 간단히 하자면
- input_model: 변환할 모델파일 경로
- model_name: IR파일의 이름 (위와같이 작성하면 resnet18.xml, resnet18.bin 파일로 만들어짐)
- s: scaling value로서 추후에 Openvino inference engine에 들어오는 input image pixel 값을 설정한 값으로 나눠준다.
- reverse_input_channels: 입력 이미지의 채널이 BGR이면 RGB로 RGB는 BGR로 바꿔준다.
- input_shape: 입력 input image shape (입력 이미지 shape과 반드시 같아야 하며 PyTorch는 [b, c, w, h] Tensorflow는 [b, w, h, c]순서로 적어야 한다.)
3. PyTorch Inference
import torch
import cv2
import timm
import os
import time

model = timm.create_model('resnet18', pretrained=True)
model.eval()

with open('classname.txt', 'r') as f:
    classes = eval(f.read())


with torch.no_grad():
    all_time = 0
    for img_id in os.listdir('images'):
        try:
            image = cv2.imread(os.path.join('images', img_id))
            src = image.copy()
            image = cv2.resize(image, (224, 224))
            image = cv2.cvtColor(image, cv2.COLOR_BGR2RGB)
            image = torch.from_numpy(image).permute(2, 0, 1).unsqueeze(0).float() / 255
            start_time = time.time()
            output = model(image)
            end_time = time.time()
            fps = 1 / (end_time - start_time)
            all_time += (end_time - start_time)

            predicted = output.argmax(1).item()
            print(f"FPS : {fps:.3f}  |  TIME : {end_time - start_time:.3f}s, | PREDICT : {classes[predicted]}")

            cv2.putText(src, classes[predicted], (0, 50), cv2.FONT_HERSHEY_SIMPLEX, 1, (255, 100, 0), thickness=3)
            cv2.imshow('sample', src)
            key = cv2.waitKey(1)
            if key % 256 == 27:  # esc stop
                break

        except:  # gray scale 이미지는 패스
            continue

    print(f"Total inference time: {round(all_time, 3)}s")
    cv2.destroyAllWindows()
4. OpenVINO Inference
import argparse
import pdb
import sys
import os
import time
import cv2
import numpy as np
from openvino.inference_engine import IECore

def parse_args() -> argparse.Namespace:
    """Parse and return command line arguments"""
    parser = argparse.ArgumentParser(add_help=False)
    args = parser.add_argument_group('Options')
    args.add_argument('-m', '--model', required=True, type=str,
                      help='Required. Path to an .xml or .onnx file with a trained model.')
    args.add_argument('-d', '--device', default='CPU', type=str,
                      help='Optional. Specify the target device to infer on; CPU, GPU, MYRIAD, HDDL or HETERO: '
                           'is acceptable. The sample will look for a suitable plugin for device specified. '
                           'Default value is CPU.')
    return parser.parse_args()


def main():
    with open('classname.txt', 'r') as f:
        classes = eval(f.read())

    args = parse_args()
    # ---------------------------Step 1. Initialize inference engine core--------------------------------------------------
    ie = IECore()

    # ---------------------------Step 2. Read a model in OpenVINO Intermediate Representation or ONNX format---------------
    # (.xml and .bin files) or (.onnx file)
    net = ie.read_network(args.model)
    # ---------------------------Step 3. Configure input & output----------------------------------------------------------
    # Get names of input and output blobs
    input_blob = next(iter(net.input_info))
    out_blob = next(iter(net.outputs))
    # Set input and output precision manually
    net.input_info[input_blob].precision = 'FP32'
    net.outputs[out_blob].precision = 'FP32'

    # Get a number of classes recognized by a model
    num_of_classes = max(net.outputs[out_blob].shape)

    # ---------------------------Step 4. Loading model to the device-------------------------------------------------------
    exec_net = ie.load_network(network=net, device_name=args.device)

    # ---------------------------Step 5. Create infer request--------------------------------------------------------------
    # load_network() method of the IECore class with a specified number of requests (default 1) returns an ExecutableNetwork
    # instance which stores infer requests. So you already created Infer requests in the previous step.

    # ---------------------------Step 6. Prepare input---------------------------------------------------------------------

    all_time = 0

    for img_id in os.listdir('images'):
        try:
            original_image = cv2.imread(os.path.join('images', img_id))
            src = original_image.copy()
            original_image = cv2.cvtColor(original_image, cv2.COLOR_BGR2RGB)
        except:
            continue

        image = original_image.copy()
        _, _, h, w = net.input_info[input_blob].input_data.shape
        if image.shape[:-1] != (h, w):
            image = cv2.resize(image, (w, h))

        # Change data layout from HWC to CHW
        image = image.transpose((2, 0, 1))
        # Add N dimension to transform to NCHW
        image = np.expand_dims(image, axis=0)


        # ---------------------------Step 7. Do inference----------------------------------------------------------------------
        start_time = time.time()
        res = exec_net.infer(inputs={input_blob: image})  # dictinary
        end_time = time.time()
        fps = 1 / (end_time-start_time)
        all_time += (end_time-start_time)


        # ---------------------------Step 8. Process output--------------------------------------------------------------------
        # Generate a label list
        res = res[out_blob]  # (1, 1000)
        # Change a shape of a numpy.ndarray with results to get another one with one dimension
        probs = res.reshape(num_of_classes)  # (1000,)
        # Get an array of args.number_top class IDs in descending order of probability

        top = probs.argmax()
        cv2.putText(src, classes[top], (0, 50), cv2.FONT_HERSHEY_SIMPLEX, 1, (255, 0, 0), thickness=3)
        print(f"FPS : {fps:.3f}  |  TIME : {end_time - start_time:.3f}s, | PREDICT : {classes[top]}")

        cv2.imshow('sample', src)
        key = cv2.waitKey(1)
        if key % 256 == 27:  # esc stop
            break
    print(f"Total inference time: {round(all_time, 3)}s")  # 14.078s 12.95s 12.941 12.587
    cv2.destroyAllWindows()

if __name__ == '__main__':
sys.exit(main())- 위의 코드가 OpenVINO inference코드인데 크게 어려운것이 없어 천천히 코드를 읽어보면 바로 이해가 갈 것이라고 생각한다.
- IECore라는 파이썬 inference engine 모듈을 import 하여 파이썬 코드에서 inference code를 작성할 수 있다.
- 파이썬코드를 실행하면 내부적으로는 c++로 돌아가기 때문에 c++로 코드를 짠다면 좀 더 다양하고 빠른 처리를 할 수 있다고 한다.
- res = exec_net.infer(inputs={input_blob: image}) 이 부분이 PyTorch의 res = model(image) 과 같은 역할을 한다고 이해하면 된다.
- argparser의 args.model에 resnet18.xml주게 되면 ie.read_network() 내부적으로 이름이 같은 .bin파일까지 찾아내 에러가 나지 않지만 만약 확장자를 제외한 두 파일의 이름이 다르다면 두 파일을 직접 파라미터로 주어야 한다.
5. Result
| PyTorch Inference | OpenVINO Inference | |
| Image Classification- ResNet18 | 0.070s | 0.012s |
- 두 inference의 output은 같지만 OpenVINO 쪽이 무려 5배 이상 빠른 것을 볼 수 있다.
TIPs
1. Model Optimizer의 파라미터중 data_type이 있는데 FP16이나 INT8 등의 mixed precision을 적용 할 수 있으며 이를 통해 더 빠른 inference 속도를 얻을 수 있지만 성능 하락이 일어날 우려가 있다. (참고로 Intel CPU에서는 FP32만 사용 가능하다!!)
2. 배치사이즈를 키워서 한번에 예측하는 것이 배치사이즈가 1인 것보다 더 빠르다.
3. Object Detection의 YOLO 라인업과 같이 Feature map 중간에 output이 있는 경우는 위처럼 Model Optimizer를 하면 에러가 나게 된다. 이 경우는 아래와 같이 수행한다.
- onnx 파일을 netron 사이트(reference 참고)에 올리게 되면 모델 레이어 그래프가 나오게 되는데 여기서 output위치를 찾고 output에서 제일 가까운 Convolution layer를 클릭해 번호 얻는다.
- ex) --output Conv_100, Conv 250, Conv 200
4. 필자는 IDE로 PyCharm을 사용하는데 Openvino Inference 코드 위쪽에 from openvino.inference_engine import IECore 에 빨간줄이 생기게 되고 실행을 IDE에서 하게되면 No module named 'openvino' 에러가 발생한다.
그 이유는 IDE에서는 가상환경의 python을 사용하지만 Openvino Inference 코드에서는 OpenVINO 내의 python을 사용해야 하기 때문에 터미널을 열고 source /opt/intel/openvino_2021/bin/setupvars.sh 를 쳐서 먼저 OpenVINO 환경으로 초기화 해 준뒤에 터미널에서 코드를 실행하면 잘 작동한다. -> OpenVINO를 통한 Inference 코드는 터미널에서 실행하자!
Ending
이번 포스팅에서는 OpenVINO toolkit에 대해 알아보았다.
여러 데이터셋과 모델을 Openvino에 올려보면서 느낀점은 왠만하면 Inference Time을 절약할 수 있는 것 같다. 다만 효과의 정도가 데이터셋에 따라 모델에 따라 Task에 따라 달라서 직접 해보기 전에 변화를 예측하기는 어려운 것 같다.
아쉬운점은 Optimization의 꽃이라고 할 수 있는 Mixed Precision은 Intel GPU 혹은 FPGA에서만 사용 가능하다는 것이다. 일부로 의도한 것인지는 알 수 없으나 Nvidia GPU도 사용할 수 있게 되면 훨씬 더 널리 사용되지 않을까 싶다.
Reference
'Deep Learning' 카테고리의 다른 글
| [블로그 리뷰] Self-supervised learning: The dark matter of intelligence (0) | 2021.12.16 |
|---|---|
| [논문리뷰] Masked Autoencoders Are Scalable Vision Learners (0) | 2021.12.01 |
| Detectron2 + weights and biases + multi gpu (17) | 2021.07.22 |
| [논문리뷰] Swin Transformer (1) | 2021.05.30 |
| [논문리뷰] DeiT (Data-efficient image Transformers) (0) | 2021.05.25 |